Part 5: Packet Crafting And Editing
Table of contents
Introduction
In the previous Packet parsing tutorial we demonstrated how PcapPlusPlus parses packets and how to read data out the various layers. In this tutorial we’ll focus on editing packets - meaning change existing protocol data, add more data and add/remove layers, and also how to craft new packets from scratch.
Of course we won’t go over all the protocols, we’ll focus on a few which are popular:
- Ethernet
- VLAN
- IPv4
- TCP
- UDP
- HTTP
- DNS
For further information about these protocols and the other protocols supported in PcapPlusPlus please go to the API documentation
Packet editing
In this part of the tutorial we’ll read a packet from a pcap file, let PcapPlusPlus parse it, and then see how we can edit and change the data in each layer. Let’s start by writing a main() method and add the includes that we need:
#include "stdlib.h"
#include "SystemUtils.h"
#include "Packet.h"
#include "EthLayer.h"
#include "VlanLayer.h"
#include "IPv4Layer.h"
#include "TcpLayer.h"
#include "HttpLayer.h"
#include "UdpLayer.h"
#include "DnsLayer.h"
#include "PcapFileDevice.h"

int main(int argc, char* argv[])
{
    // We'll write our code here
}
As you can see we added an include to Packet.h which contains the basic parsed packet structures, to PcapFileDevice.h which contains the API for reading/writing from/to pcap files and to all of the layers which we will edit and add data from. In addition we included SystemUtils.h for using hostToNet16() which we’ll use later.
Now let’s read the packet from the pcap file. This pcap file contains only 1 packet, so we’ll open the reader, read the packet and close the reader:
// use the IFileReaderDevice interface to automatically identify file type (pcap/pcap-ng)
// and create an interface instance that both readers implement
pcpp::IFileReaderDevice* reader = pcpp::IFileReaderDevice::getReader("1_http_packet.pcap");

// verify that a reader interface was indeed created
if (reader == NULL)
{
    printf("Cannot determine reader for file type\n");
    exit(1);
}

// open the reader for reading
if (!reader->open())
{
    printf("Cannot open input.pcap for reading\n");
    exit(1);
}

// read the first (and only) packet from the file
pcpp::RawPacket rawPacket;
if (!reader->getNextPacket(rawPacket))
{
    printf("Couldn't read the first packet in the file\n");
    return 1;
}

// close the file reader, we don't need it anymore
reader->close();
The next step is to let PcapPlusPlus parse the packet by creating an instance of the Packet class and giving it in the constructor a pointer to the RawPacket instance we have:
// parse the raw packet into a parsed packet
pcpp::Packet parsedPacket(&rawPacket);
You may notice this is exactly the same packet as we used in the Packet parsing tutorial but this time we won’t just read data from the various layers but actually change it. First thing we’ll do is get the Ethernet layer and change it:
// now let's get the Ethernet layer
pcpp::EthLayer* ethernetLayer = parsedPacket.getLayerOfType<pcpp::EthLayer>();
// change the source dest MAC address
// change the source dest MAC address
ethernetLayer->setDestMac(pcpp::MacAddress("aa:bb:cc:dd:ee:ff"));
As you can see, we changed the destination MAC address to "aa:bb:cc:dd:ee" We used the setDestMac() method exposed in EthLayer to do that and we gave it a MacAddress class instance we created with the new MAC address we want.
Ethernet layer is quite simple, let’s move to a more complex layer - IPv4, and see what data we can change there:
// let's get the IPv4 layer
pcpp::IPv4Layer* ipLayer = parsedPacket.getLayerOfType<pcpp::IPv4Layer>();
// change source IP address
ipLayer->setSrcIPv4Address(pcpp::IPv4Address(std::string("1.1.1.1")));
// change IP ID
ipLayer->getIPv4Header()->ipId = pcpp::hostToNet16(4000);
// change TTL value
ipLayer->getIPv4Header()->timeToLive = 12;
First we changed the source IPv4 address to "1.1.1.1" using the method setSrcIPv4Address() and provided it an instance of the class IPv4Address with the value of "1.1.1.1". Then, we used the getIPv4Header() method which casts the raw packet bytes to a struct called iphdr* in the same way we did in the packet parsing tutorial, but this time instead of reading values we’re changing them. It is very important to understand that the iphdr* object gives access to the actual packet bytes so it can be both read and manipulated, and each change affects the actual packet data. When setting fields which are wider than 1 byte it’s important to write in network order and that’s why we’re using hostToNet16() to set the IP ID to 4000.
Let’s move on to the next layer - TCP:
// let's get the TCP layer
pcpp::TcpLayer* tcpLayer = parsedPacket.getLayerOfType<pcpp::TcpLayer>();
// change source port
tcpLayer->getTcpHeader()->portSrc = pcpp::hostToNet16(12345);
// add URG flag
tcpLayer->getTcpHeader()->urgFlag = 1;
// add MSS TCP option
tcpLayer->addTcpOptionAfter(pcpp::TcpOptionBuilder(pcpp::TCPOPT_MSS, (uint16_t)1460));
We start by using the method getTcpHeader() which casts the raw packet bytes to a struct tpchdr* which contains all of the TCP fields. Again, like we saw in IPv4Layer, this method gives access to the actual packet bytes so every change we do changes the packet. So we changed the source port to 12345 and set the URG flag.
Now let’s take a look at the 2 bottom lines in the code snippet above. TcpLayer exposes an API to read, add and remove TCP options. The packet we’re editing already has 3 TCP options: NOP, NOP and Timestamp. We’d like to add a fourth one of type MSS with MSS value of 1460 and we want it to appear first (before the existing TCP options). So we use the addTcpOptionAfter() method and give it a TcpOptionBuilder object. This builder object gets in its constructor the TCP option type (which is PCPP_TCPOLEN_MSS), and the option value (1460) and addTcpOptionAfter() uses it to create the TCP option object and add it to the existing list of TCP options. That’s it! with 1 line of code we managed to add a new TCP option!
Now let move on to the last layer in this packet: HTTP. Let’s see the code:
// let's get the HTTP layer
pcpp::HttpRequestLayer* httpRequestLayer = parsedPacket.getLayerOfType<pcpp::HttpRequestLayer&hl;();
// change the request method from GET to TRACE
httpRequestLayer->getFirstLine()->setMethod(pcpp::HttpRequestLayer::HttpTRACE);
// change host to www.google.com
httpRequestLayer->getFieldByName(PCPP_HTTP_HOST_FIELD)->setFieldValue("www.google.com");
// change referer value to www.aol.com
httpRequestLayer->getFieldByName(PCPP_HTTP_REFERER_FIELD)->setFieldValue("www.aol.com");
// remove cookie field
httpRequestLayer->removeField(PCPP_HTTP_COOKIE_FIELD);
// add x-forwarded-for field
pcpp::HttpField* xForwardedForField = httpRequestLayer->insertField(httpRequestLayer->getFieldByName(PCPP_HTTP_HOST_FIELD), "X-Forwarded-For", "1.1.1.1");
// add cache-control field
httpRequestLayer->insertField(xForwardedForField, "Cache-Control", "max-age=0");
We already discussed the highlights of the HttpLayer API in the Packet parsing tutorial so we won’t repeat all of it again. But as you can see the API provides setters for all of the relevant data:
HttpRequestFirstLineexposes is a setter for the HTTP methodsetMethod()where we change it toTRACE. Similar methods exist for the URI and version- When retrieving HTTP fields, the
HttpFieldclass exposes a method ofsetFieldValue()for setting the field value (demonstrated above for"Host"and"Referer"fields) HttpLayerexposes methods for adding new fields:insertField()andaddField(), and methods for removing existing fields:removeField(). Here we demonstrated how to add"X-Forwarded-For"and"Cache-Control"header fields (and set their values) and how to remove the"Cookie"header field
So far we’ve seen editing of existing layers. But what about adding new layers or removing existing ones?
Of course this is also possible using the Packet class API. Let’s demonstrate how to add a VLAN layer between the Ethernet and IPv4 layer:
// create a new vlan layer
pcpp::VlanLayer newVlanLayer(123, false, 1, PCPP_ETHERTYPE_IP);

// add the vlan layer to the packet after the existing Ethernet layer
parsedPacket.insertLayer(ethernetLayer, &newVlanLayer);
First we created a new VlanLayer instance and gave it the necessary parameters which are VLAN ID (123), CFI (false), priority (1) and the Ether type for the next layer (IPv4). Then we added this layer to the packet right after the Ethernet layer using insertLayer() method. Nice and simple :)
In the same way we added a new layer we can also remove layers from the packet using the Packet::removeLayer() method.
We’ve made quite a lot of changes to the packet. Let’s save it to a pcap file and view the result in Wireshark. But before doing that let’s first instruct the packet to re-calculate all of the layers’ calculated fields:
// compute all calculated fields
parsedPacket.computeCalculateFields();

// write the modified packet to a pcap file
pcpp::PcapFileWriterDevice writer("1_modified_packet.pcap");
writer.open();
writer.writePacket(*(parsedPacket.getRawPacket()));
writer.close();
Now let’s open "1_modified_packet.pcap" in Wireshark and view the result:
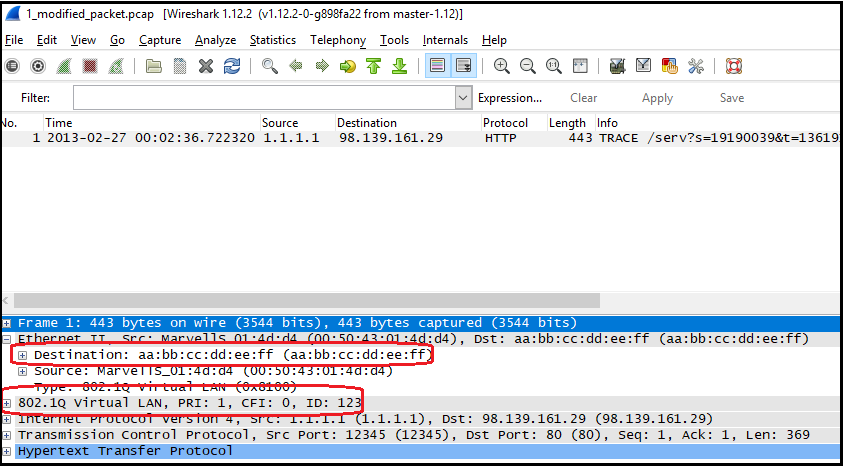
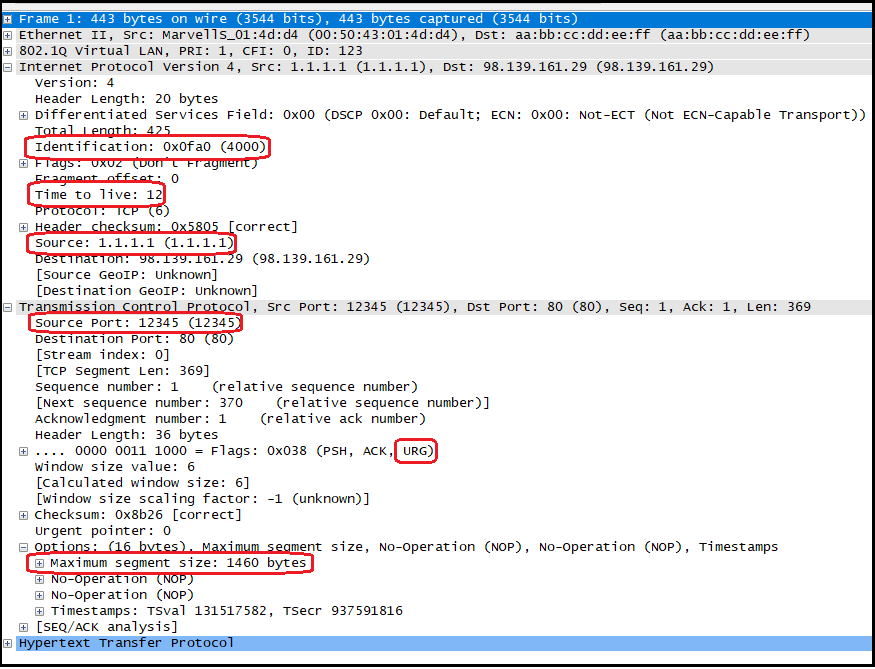
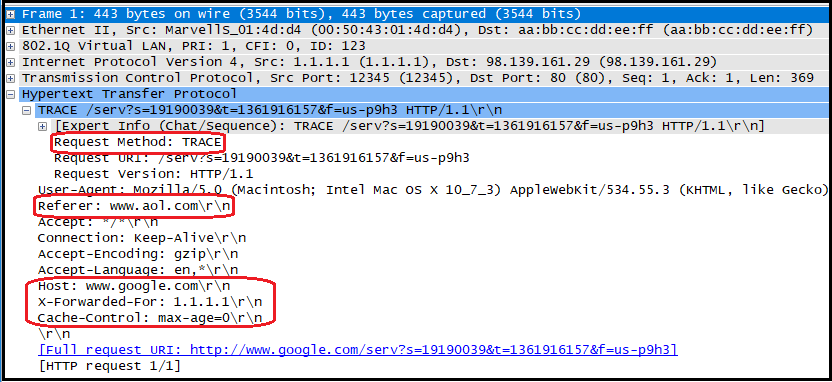
Packet Creation
In this part of the tutorial we’ll build a packet from scratch, create the different layers one by one and eventually save it to a pcap file to verify packet data is the same as expected.
Let’s start by creating the first layer - an Ethernet layer:
// create a new Ethernet layer
pcpp::EthLayer newEthernetLayer(pcpp::MacAddress("00:50:43:11:22:33"), pcpp::MacAddress("aa:bb:cc:dd:ee"));
What we did here is create a new instance of the EthLayer class and give it the necessary parameters which are source and dest MAC addresses (both are instances of the MacAddress class instantiated with the MAC address string). Rather easy right?
Now let’s move on to the second layer - IPv4:
// create a new IPv4 layer
pcpp::IPv4Layer newIPLayer(pcpp::IPv4Address(std::string("192.168.1.1")), pcpp::IPv4Address(std::string("10.0.0.1")));
newIPLayer.getIPv4Header()->ipId = pcpp::hostToNet16(2000);
newIPLayer.getIPv4Header()->timeToLive = 64;
Here we created a new instance of the IPv4Layer and gave it the necessary parameters which are source and dest IP addresses (both are instances of the IPv4Address class instantiated with the IP address string). Next, we wanted to set the IP ID and TTL values of this layer. As you can see we do that using the same API we used in the Packet editing part: call the getIPv4Header() method to get an instance of the iphdr* struct (which is actually a pointer to the packet raw data cast to iphdr*) and set the IP ID and TTL values. Since IP ID is 2-bytes long we use hostToNet16() to convert from host to network order.
Now let’s move on to the third layer - UDP:
// create a new UDP layer
pcpp::UdpLayer newUdpLayer(12345, 53);
As you can see, this is quite straight forward: we created a new instance of UdpLayer and gave it in the constructor the source and dest UDP ports.
Let’s move on to the fourth and last layer - DNS:
// create a new DNS layer
pcpp::DnsLayer newDnsLayer;
newDnsLayer.addQuery("www.ebay.com", pcpp::DNS_TYPE_A, pcpp::DNS_CLASS_IN);
Here we first created an instance of DnsLayer with the default constructor (without any parameters). Then we added a DNS query record to the layer using the addQuery() method and gave it the query parameters which are: query name (“www.ebay.com”), query type (type A means IPv4 address) and query class (class IN means Internet).
That’s it! we created 4 layers, now let’s add them to a new packet. Let’s first create a new Packet instance:
// create a packet with initial capacity of 100 bytes (will grow automatically if needed)
pcpp::Packet newPacket(100);
The value 100 we gave in the constructor is the expected length of the packet (in bytes). When we give this number a buffer of size 100 is automatically created and will be used to store the packet raw data. Of course, if our packet exceeds 100 bytes this buffer will be automatically extended, but this has a performance cost, so in applications that require high performance it’s better to allocate this buffer in advanced (meaning setting the buffer size in the constructor). Now it’s time to add all the layers we created to the packet, we’ll use the addLayer() method for that:
// add all the layers we created
newPacket.addLayer(&newEthernetLayer);
newPacket.addLayer(&newIPLayer);
newPacket.addLayer(&newUdpLayer);
newPacket.addLayer(&newDnsLayer);
We’re almost done. All that is left is to call the computeCalculateFields() method to calculate the layers’ calculated fields:
// compute all calculated fields
newPacket.computeCalculateFields();
Our packet is ready! Now let’s save it to a pcap file and open this file in Wireshark to verify the packet looks exactly like we built it:
// write the new packet to a pcap file
pcpp::PcapFileWriterDevice writer2("1_new_packet.pcap");
writer2.open();
writer2.writePacket(*(newPacket.getRawPacket()));
writer2.close();
Now let’s compile the code, run it and open the "1_new_packet.pcap" file in Wireshark:
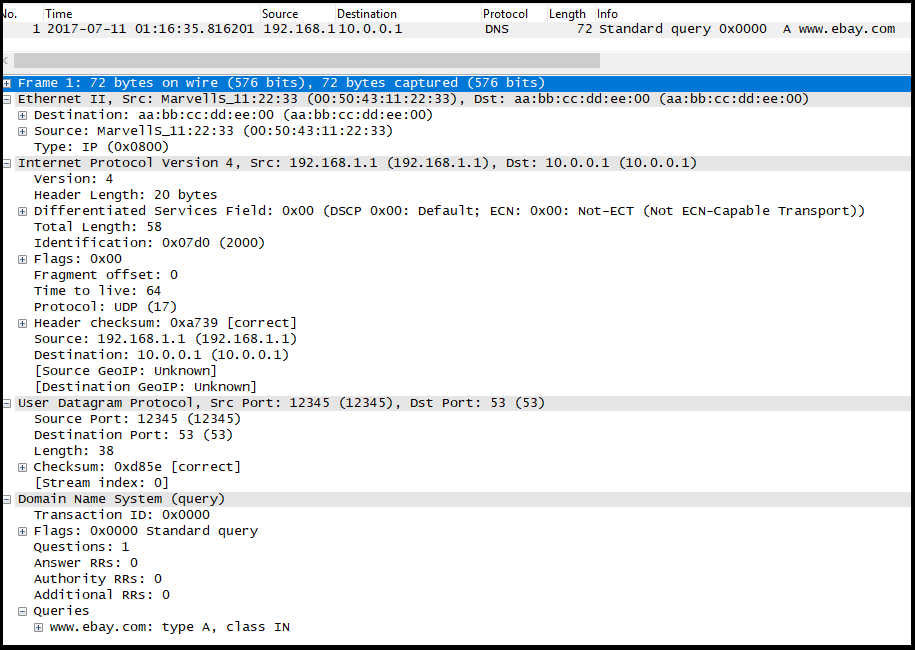
As you can see, the packet looks exactly as expected.
Running the example
All code that was covered in this tutorial can be found here. In order to compile and run the code please first download and compile PcapPlusPlus code or downloaded a pre-compiled version from the v21.05 release. Then follow these instruction, according to your platform:
- Linux, MacOS, FreeBSD - make sure PcapPlusPlus is installed (by running sudo make install in PcapPlusPlus main directory). Then either change the
Makefile.non_windowsfile name toMakefileand runmake all, or runmake -f Makefile.non_windows all - Windows using MinGW or MinGW-w64 - either change the
Makefile.windowsfile name toMakefileand runmake all, or runmake -f Makefile.windows all - Windows using Visual Studio - there is a Visual Studio solution containing all tutorials:
mk\[vs_version]\Tutorials.sln. Just open it and compile all tutorials
In all options the compiled executable will be inside the tutorial directory ([PcapPlusPlus Folder]/Examples/Tutorials/Tutorial-PacketCraftAndEdit)