Part 1: Introduction And Basics
Table of contents
- Library structure
- Packets and Layers
- Packet capture engines
- Writing a simple app including a makefile
- Writing a simple app in Visual Studio
- Running the example
Library structure
As you could probably already notice, PcapPlusPlus is built of 3 libraries: Common++, Packet++ and Pcap++. Let’s describes the purposes of each one and its main classes:
Packet++
A library for parsing, creating and editing packets of various supported protocols. This library can be used stand-alone and doesn’t depend on Pcap++, libpcap/WinPcap/Npcap, etc. Main classes and utilities:
RawPacket- representing the raw data captured from the networkLayer- the base class for all protocol layers. Each protocol layer is in-charge of parsing the specific bytes in the packet that belong to this protocolPacket- representing a packet that was parsed by the different PcapPlusPlus protocol parsers and contains the different protocol layers- Protocol layers (for example:
EthLayer, IPv4Layer, IPv6Layer, TcpLayer, UdpLayer, DnsLayer, HttpRequestLayer, HttpResponseLayer, PayloadLayer, etc.) - classes representing specific protocol parsers. All inherit theLayerclass PacketUtils- a class containing several widely used utilities such as calculating a hash value based on 5-tuple or 2-tupleTcpReassembly- a class for providing TCP reassembly (a.k.a TCP reconstruction) of TCP streamsIPv4Reassembly- a class for providing IPv4 reassembly (a.k.a IPv4 de-fragmentation) of IPv4 packets
Pcap++
A library for intercepting and sending packets, providing network and NIC info, stats, etc. This library is mostly a C++ wrapper for packet capturing engines such as libpcap, WinPcap, Npcap, DPDK and PF_RING, but also provide some unique features and capabilities that doesn’t exist in any of these engines. Main classes and utilities:
PcapLiveDevice- representing a Linux/MacOS/FreeBSD network interface and enables capturing and sending packets as well as retrieving interface information. Also available for rooted Android devicesWinPcapLiveDevice- representing a Windows network interface and contains all functionality exposed inPcapLiveDevice. This class actually inheritsPcapLiveDeviceand does the relevant adjustments for WinPcap/Npcap and Windows OSDpdkDevice- representing a DPDK-enabled network interface and wraps DPDK basic functionality for capturing and sending packets as well as retrieving interface informationPfRingDevice- representing PF_RING-enabled network interface and wraps PF_RING functionality for capturing and sending packets as well as retrieving interface informationPcapRemoteDevice- representing a network interface on a remote machine and enables to capture and send packets on this interface using the rpcap protocol. This class actually wraps WinPcap’s Remote Capture capabilities and so available only on Windows- pcap and pcap-ng file readers and writers (
PcapFileReaderDevice, PcapFileWriterDevice, PcapNgFileReaderDevice, PcapNgFileWriterDevice, IFileReaderDevice, IFileWriterDevice) - Packet filtering engine - a C++ API for the BPF (Berkeley Packet Filter) format for easy-to-use packet filtering from a network interface or pcap/pcap-ng file
NetworkUtils- a class containing common and basic actions requiring network interaction such as discovery of a remote machine MAC address by sending ARP requests, discovery of IPv4 address from a host-name (by sending DNS requests), and so on
Common++
A library containing common code utilities and classes used by both Packet++ and Pcap++. Main classes and utilities:
IPv4Address, IPv6Address- classes representing IPv4 and IPv6 addresses accordinglyMacAddress- a class representing a MAC (Ethernet) addressIpUtils.h- all kinds of helpful network utilitiesLoggerPP- a simple logging infrastructure used widely in PcapPlusPlusSystemUtils.h- several useful utilities for interaction with the operating system
Packets and Layers
Parsing and crafting of packets is one of the fundamentals of PcapPlusPlus and the heart of the Packet++ library. We’ll dive deep into it later, but first let’s understand the basic structures as everything else is built on that.
Raw packets vs. Parsed packets
There are 2 types of packets in PcapPlusPlus: raw packets and parsed packets. A raw packet is the raw byte-stream that was captured from the network together with the timestamp it was captured on. A raw packet doesn’t contain any data about the protocols it’s built from and of course protocol data can’t be added, removed or edited. On the other hand, parsed packets are packets that contain all protocol data and can be edited per protocol. This reveals one of the core functionalities of PcapPlusPlus: taking raw packets that were captured from the network and create parsed packets out of them, meaning identifying their protocols, saving meta data about these protocols, and allowing the user easy access to all of this parsed data for both reading and writing (edit, add data and remove data).
Layers
A layer in PcapPlusPlus means protocol layer. Parsed packets contain layers, each one represents a protocol the packet is built from. For example: an HTTP packet may contain an Ethernet layer, an IPv4 (or IPv6) layer, a TCP layer and an HTTP layer. Each supported protocol is represented by a corresponding layer class. A layer class exposes the protocol’s data for the user to read and usually also to write or modify. For example: A TCP layer exposes all TCP fields like ports, flags, sequence numbers, TCP options, etc. and also allows editing of all of those fields and also adding/removing/editing TCP options. Layers inside a parsed packet are ordered in a link list so the parsed packet actually points only to the first (lowest) layer (for example: Ethernet), this layer points to the next layer (for example: IPv4), and so on. A list of all supported protocols (and layers) can be found here.
Packet and Layers schematic structure
In the following diagram you can see the relations between RawPackets, (parsed) Packets and Layers:

As can be seen in this diagram, a Packet (= parsed packet) holds a pointer to the RawPacket object and to the first (lowest) Layer. Each Layer has pointers to the next layer and to the previous one.
It may be implied from this structure that the actual packet data (the raw byte stream) is duplicated between the raw packet and the various layers. This is not the case. We don’t want to duplicate the data from various reasons:
- We don’t want the packet object to take up too much memory
- We would like the avoid unnecessary data coping because it’s expensive
- Since each layer can be edited, we would like the edited data to be written directly to the byte stream and not copied from one place to another
So the raw byte stream is actually stored once, in the RawPacket object. The various layers only point to the relevant place where their data begins. Here is a diagram to visualize it:
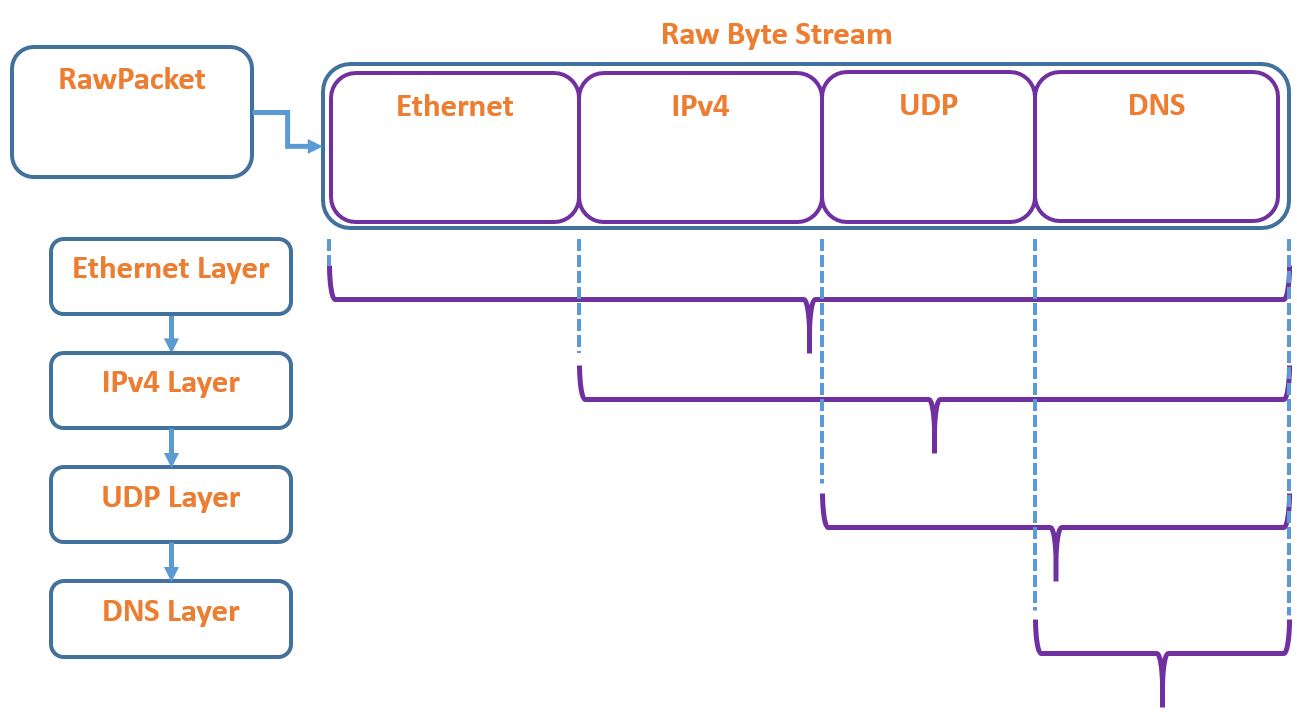
As you can see in this diagram, each layer points to the place in the raw data where its data starts. In this example: Ethernet Layer points to the beginning of the raw data because it is the first layer, so it actually sees all the raw data. On the other hand, IPv4 Layer points to the place where IPv4 data begins so it doesn’t see the Ethernet data. UDP Layer points to the place where UDP data starts so it doesn’t see the Ethernet and IPv4 data, and so on.
All of these structures and pointers are built by PcapPlusPlus packet parsing engine residing in the Packet class. When a Packet object is created it is given a RawPacket object (which is created by the capturing engine) and the parsing process begins by understanding which protocols the packet is built of and creating the relevant Layer objects. Another option is to create an “empty” Packet object which doesn’t contain any raw data and start building the layers ourselves. In that case a RawPacket object will be created and gradually built.
Packet capture engines
Capturing and sending packets is another fundamental principal in PcapPlusPlus and is the heart of the Pcap++ library. The idea is to provide a simple, easy-to-use and as similar as possible interface to capture and send packets from different types of packet capture engines. Different types can be files (pcap/pcap-ng), network interfaces via libpcap/WinPcap/Npcap, DPDK-enabled interfaces, PF_RING-enabled interfaces, etc. This is not always easy because the APIs and work-flows of the different engines is sometimes very different from one another and it’s difficult to keep one flow who suits them all. Also, many of the engine have specific OS and platform requirements, and this is also a challenge. The engine families currently supported are:
- Files (pcap and pcap-ng)
- Network interfaces using libpcap or WinPcap/Npcap
- DPDK-enabled interfaces
- PF_RING-enabled interfaces
- Remote packet capture
Each packet capture engine is represented in PcapPlusPlus in a class called “Device”. All devices inherit from a common abstract parent class called IPcapDevice which contains a few capabilities that are common for most devices such as opening/closing the device, gathering packet statistics, setting a filter, etc. The rest is implemented in each class.
The next parts of the tutorial will dive deep into the various device types and explain how to use them.
Writing a simple app including a makefile
Creating applications using PcapPlusPlus is rather easy. Let’s have a guided tour demonstrating how to create a simple application and its Makefile or Visual Studio project.
First let’s make sure PcapPlusPlus is configured and built successfully. Please follow the download page for building instructions.
Another option is to download a pre-compiled version of PcapPlusPlus, please download the v21.05 release for your platform and follow the instructions on how to configure it.
Now all we need is under the Dist/ directory. We can find the PcapPlusPlus libraries, header files under Dist/header, compiled examples under Dist/examples and helpful makefiles we’ll going to use under Dist/mk
So let’s write some code and put it in main.cpp:
#include <IPv4Layer.h>
#include <Packet.h>
#include <PcapFileDevice.h>

int main(int argc, char* argv[])
{
    // open a pcap file for reading
    pcpp::PcapFileReaderDevice reader("1_packet.pcap");
    if (!reader.open())
    {
        printf("Error opening the pcap file\n");
        return 1;
    }

    // read the first (and only) packet from the file
    pcpp::RawPacket rawPacket;
    if (!reader.getNextPacket(rawPacket))
    {
        printf("Couldn't read the first packet in the file\n");
        return 1;
    }

    // parse the raw packet into a parsed packet
    pcpp::Packet parsedPacket(&rawPacket);

    // verify the packet is IPv4
    if (parsedPacket.isPacketOfType(pcpp::IPv4))
    {
        // extract source and dest IPs
        pcpp::IPv4Address srcIP = parsedPacket.getLayerOfType<pcpp::IPv4Layer>()->getSrcIPv4Address();
        pcpp::IPv4Address destIP = parsedPacket.getLayerOfType<pcpp::IPv4Layer>()->getDstIPv4Address();

        // print source and dest IPs
        printf("Source IP is '%s'; Dest IP is '%s'\n", srcIP.toString().c_str(), destIP.toString().c_str());
    }

    // close the file
    reader.close();

    return 0;
}
This code does the following:
- Opens a pcap file (“1_packet.pcap”) containing only 1 packet
- Reads the packet
- Parses the packet (converting it from
RawPackettoPacket) - Extracts the IPv4 layer
- Reads the source and destination IPs and prints them to console
This code is rather simple. Now let’s see how to write a Makefile so this app compiles successfully:
Windows Makefile
include ../../../Dist/mk/PcapPlusPlus.mk

# All Target
all:
    g++.exe $(PCAPPP_INCLUDES) -c -o main.o main.cpp
    g++.exe $(PCAPPP_LIBS_DIR) -static-libgcc -static-libstdc++ -o Tutorial-LiveTraffic.exe main.o $(PCAPPP_LIBS)

# Clean Target
clean:
    del main.o
    del Tutorial-LiveTraffic.exe
Linux, MacOS, FreeBSD Makefile
include /usr/local/etc/PcapPlusPlus.mk

# All Target
all:
    g++ $(PCAPPP_INCLUDES) -c -o main.o main.cpp
    g++ $(PCAPPP_LIBS_DIR) -static-libstdc++ -o Tutorial-HelloWorld main.o $(PCAPPP_LIBS)

# Clean Target
clean:
    rm main.o
    rm Tutorial-HelloWorld
Now let’s explore the PcapPlusPlus.mk makefile - it contains variables that encapsulate all we need in order to compile your application with PcapPlusPlus:
PCAPPP_INCLUDES- all the include files that are needed for compilationPCAPPP_LIBS_DIR- the location of all external libraries needed for compiling and linking with PcapPlusPlusPCAPPP_LIBS- all external libraries needed for compiling and linking with PcapPlusPlusPCAPPLUSPLUS_HOME- PcapPlusPlus home directory
As you can see we used most of these variables in the Makefiles we created. The only flags we added are for static linking: -static-libstdc++ for non-Windows and -static-libgcc -static-libstdc++ for Windows (MinGW / MinGW-w64).
Now that we have the code and the Makefile let’s compile and run the code. Here is the output:
Source IP is '10.0.0.138'; Dest IP is '10.0.0.1'
Writing a simple app in Visual Studio
So far we demonstrated how to compile using GNU compilers (g++). Now let’s explore how to do it in Visual Studio. We’ll use the same code we wrote in the previous section and see how to build it using Visual Studio.
There are Visual Studio solution + VC projects for all tutorials under the mk\[vs_version] directory. [vs_version] is the Visual Studio version you choose to work with out of the supported Visual Studio versions and is determined while running PcapPlusPlus configuration script. I strongly advise to use them as a template for your Visual Studio projects. Let’s examine the Tutorial-HelloWorld.vcxproj VC project:
First of all let’s take a look at the Property Manager:
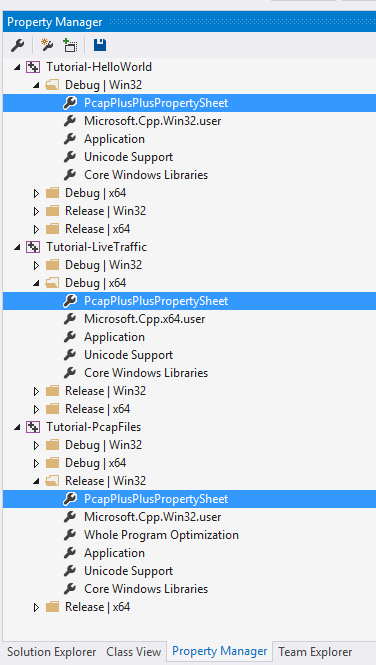
You can see that we added a PcapPlusPlus property sheet file: PcapPlusPlusPropertySheet.props. This file contains paths to the PcapPlusPlus libraries and other external libraries PcapPlusPlus is using. This file is generated automatically when you run the PcapPlusPlus Visual Studio configuration file: configure-windows-visual-studio.bat and resides under mk\[vs_version] folder. Let’s see the content of this file in my PC:
<?xml version="1.0" encoding="utf-8"?>
<Project ToolsVersion="4.0" xmlns="http://schemas.microsoft.com/developer/msbuild/2003">
  <ImportGroup Label="PropertySheets" />
  <PropertyGroup Label="UserMacros">
    <PcapPlusPlusHome>D:\PcapPlusPlus</PcapPlusPlusHome>
    <PcapSdkHome>D:\WpdPack</PcapSdkHome>
    <PThreadWin32Home>D:\pthread-win32</PThreadWin32Home>
  </PropertyGroup>
  <PropertyGroup />
  <ItemDefinitionGroup />
  <ItemGroup />
</Project>
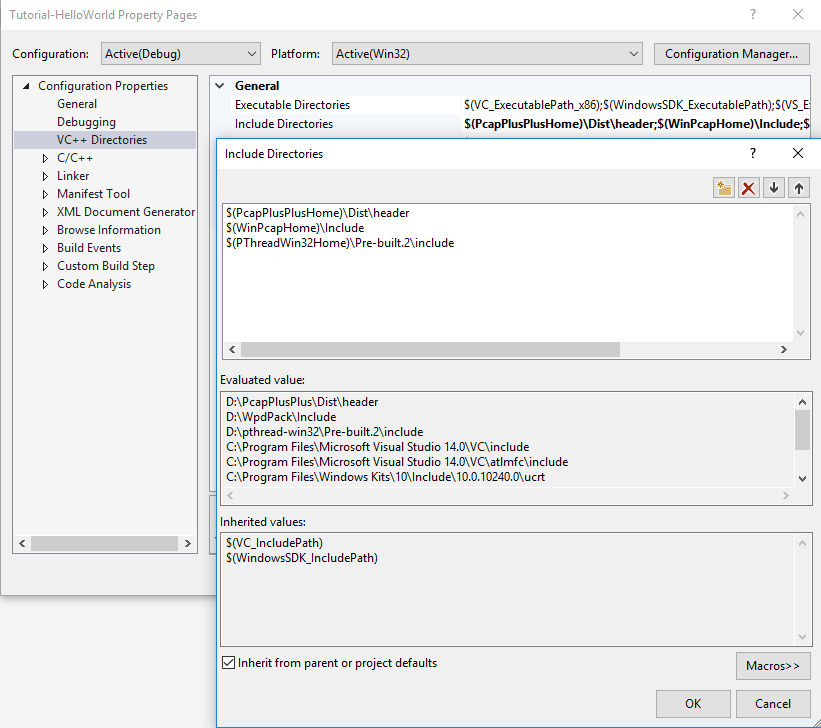
Now let’s examine the project configuration changes:
First, we added the relevant include directories:
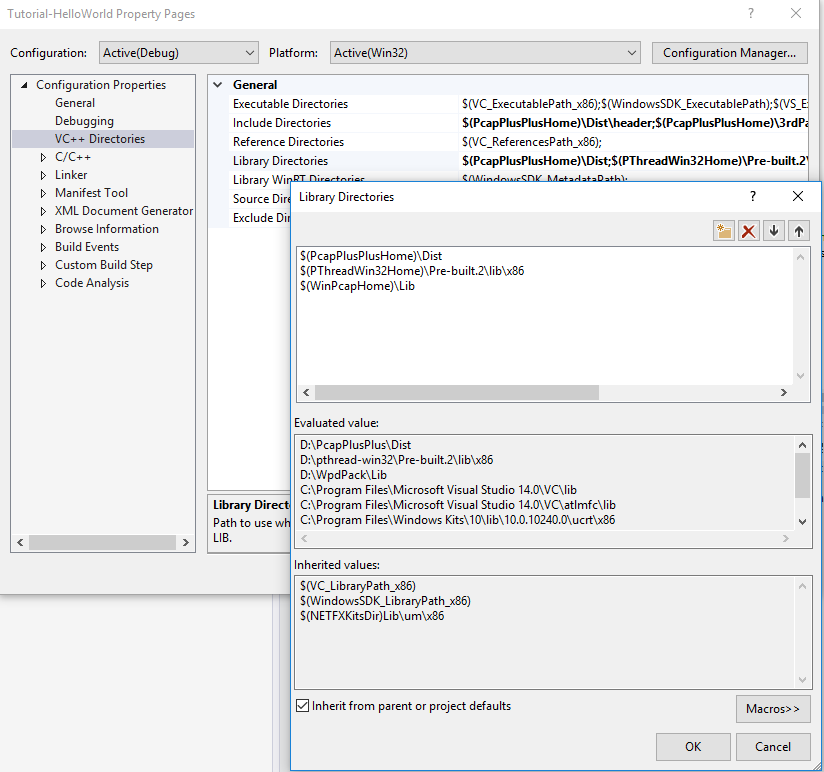
Also, we added the directories of PcapPlusPlus libraries and the external libraries PcapPlusPlus is using:
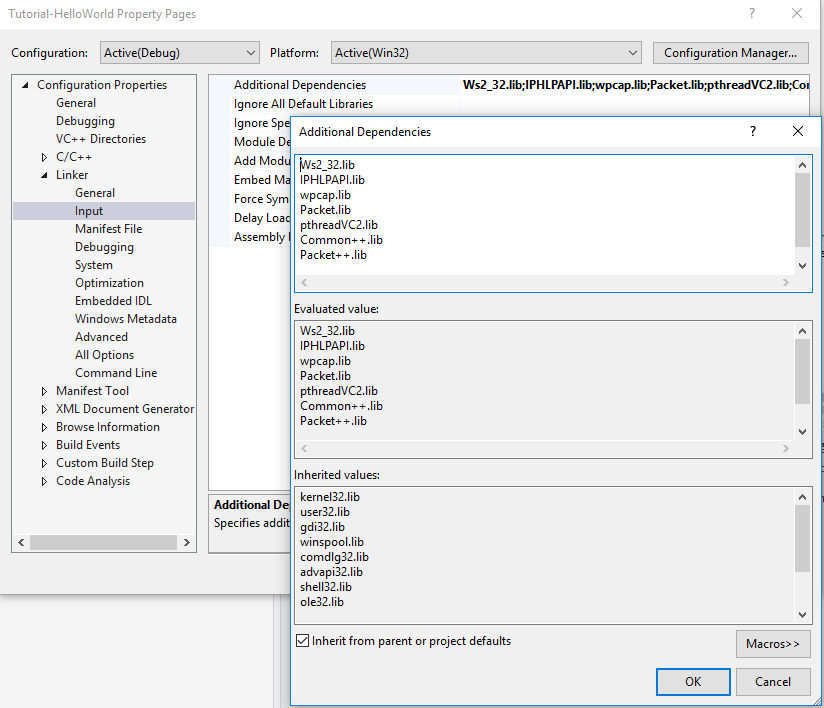
Also, we added the PcapPlusPlus libraries and the external libraries PcapPlusPlus is using:
Another small configuration change is to instruct the compiler Not Using Precompiled Headers:

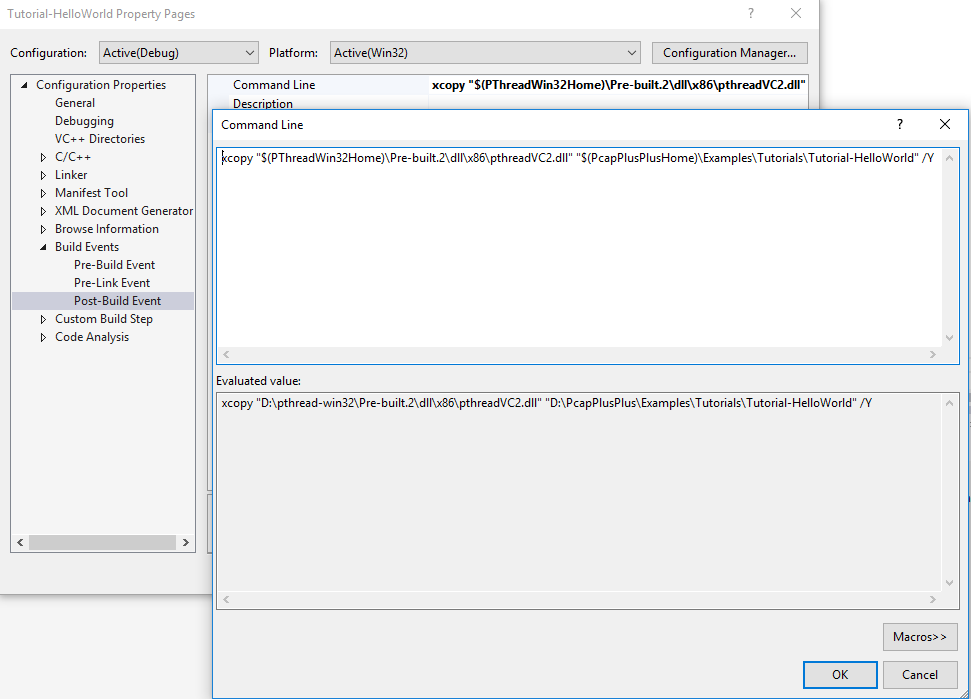
Last thing is to add a post-build event to copy pthreadVC2.dll file from the pthread-win32 directory to our output directory:
That’s it! The project will now build successfully! Again, I strongly advise to use this tutorial project as a template for your Visual Studio projects, it’s always easier that way (but that’s my opinion)
Running the example
All code that was covered in this tutorial can be found here. In order to compile and run the code please first download and compile PcapPlusPlus code or downloaded a pre-compiled version from the v21.05 release. Then follow these instruction, according to your platform:
- Linux, MacOS, FreeBSD - make sure PcapPlusPlus is installed (by running sudo make install in PcapPlusPlus main directory). Then either change the
Makefile.non_windowsfile name toMakefileand runmake all, or runmake -f Makefile.non_windows all - Windows using MinGW or MinGW-w64 - either change the
Makefile.windowsfile name toMakefileand runmake all, or runmake -f Makefile.windows all - Windows using Visual Studio - there is a Visual Studio solution containing all tutorials:
mk\[vs_version]\Tutorials.sln. Just open it and compile all tutorials
In all options the compiled executable will be inside the tutorial directory ([PcapPlusPlus Folder]/Examples/Tutorials/Tutorial-HelloWorld)